
Advanced techniques that improve card condition while staying within grading guidelines
Learn which rehabilitation methods major graders accept and how to execute them safely. This guide covers surface cleaning, edge work, corner care, and structural stabilization without crossing into tampering territory.
Rehab
- Rehabilitation preserves, alteration destroys – Removing surface contaminants is acceptable; changing card structure is not. Graders can detect manipulation with AI scanning and fingerprinting technology.
- Follow the four-phase framework – Assessment, Preparation, Intervention, and Verification. Skipping steps leads to mistakes that damage cards or raise authenticity concerns.
- Accept condition limits – Rehabilitation cannot reverse scratches, corner wear, or structural damage. Knowing when to stop protects your investment.
- Invest in proper tools and environment – Household materials cause damage. Clean workspace, appropriate brushes, and controlled lighting are non-negotiable for quality results.
- Practice on low-value cards first – Build technique before working on valuable pieces. Consider professional services for high-stakes submissions.
Guide Orientation: What This Guide Covers
This guide teaches you how to rehabilitate sports cards using advanced techniques that improve condition without compromising authenticity or market value. You’ll learn the difference between legitimate preservation and alterations that destroy resale potential.
This content is for collectors and resellers who want to maximize grades through proper preparation, not shortcuts. By the end, you’ll understand which rehabilitation methods are acceptable to major graders, how to execute them safely, and when to leave a card untouched.
We cover surface cleaning, edge work, corner care, and structural stabilization. We do not cover chemical treatments, pressing techniques that alter card composition, or any method that crosses into tampering territory.
Why Card Rehabilitation Matters Now
The grading market has exploded. 26.8 million cards were graded across major services in 2025 , up 32% from the previous year. With this volume comes increased scrutiny. Graders are better equipped than ever to detect alterations, and the consequences of submitting tampered cards range from rejected submissions to permanent account bans.
Meanwhile, the sports memorabilia and trading cards market reached $33 billion in 2025 , projected to grow to $271.2 billion by 2034. The stakes have never been higher for proper card preservation.
The cost of improper rehabilitation is severe. A PSA 9 Kobe Bryant rookie might sell for $800. The same card with detectable alterations becomes unsellable at any price. Understanding the line between preservation and tampering protects both your investment and your reputation in the hobby.
Core Concepts: Understanding Rehabilitation vs. Alteration
The Critical Distinction
Card preservation means removing foreign contaminants and stabilizing existing condition. Alteration means changing the card’s original state. Grading companies accept the first and reject the second.
Acceptable rehabilitation includes removing surface dust, fingerprint oils, and loose debris. It includes carefully addressing lifted edges that occurred after production. It does not include trimming borders, filling in scratches with foreign materials, or chemically whitening yellowed surfaces.
Common Misconceptions
Many collectors believe any cleaning is prohibited. This is false. Graders expect cards to arrive free of obvious surface contamination. What they reject is evidence of manipulation intended to artificially improve the card’s apparent grade.
Another misconception: that rehabilitation can transform a damaged card into a gem mint specimen. Advanced rehabilitation techniques stabilize and preserve. They cannot reverse structural damage, deep scratches, or significant wear. Understanding these limits prevents wasted effort and potential harm to your cards.
The Grading Accuracy Factor
Modern grading accuracy has improved dramatically. AI-assisted scanning can detect microscopic flaws instantly , measuring border centering with precision that human eyes cannot match. PSA’s implementation of Genamint’s fingerprinting technology now identifies previously graded cards, deterring crack-and-resubmit manipulation.
This technology works in your favor when you rehabilitate properly. Clean, well-preserved cards grade more accurately because surface contamination no longer obscures the card’s true condition.
The Rehabilitation Framework
Effective card rehabilitation follows a four-phase process: Assessment, Preparation, Intervention, and Verification. Each phase builds on the previous one, and skipping steps leads to mistakes.
Assessment determines what the card needs and whether intervention is appropriate. Preparation creates the proper environment and assembles correct tools. Intervention executes specific techniques matched to identified issues. Verification confirms results and catches any unintended consequences before submission.
This framework applies whether you’re working on a $50 card or a $50,000 card. The techniques scale; the discipline remains constant.
Step-by-Step Rehabilitation Process
Step 1: Comprehensive Card Assessment
Objective: Identify all condition issues and determine which are addressable through legitimate rehabilitation.
Begin with proper lighting. Use a daylight-balanced LED panel positioned at multiple angles. Natural light creates shadows that hide surface issues. Examine the card’s surface, edges, corners, and centering systematically.
Document everything. Photograph the card before any intervention. Note surface debris, fingerprint oils, edge lifting, corner softness, and any scratches or indentations. Rate each issue as addressable, partially addressable, or permanent.
What to avoid: Rushing assessment to begin work. Missing a deep scratch because you focused only on surface dust. Overestimating what rehabilitation can accomplish.
Success indicators: You have a written inventory of every condition issue. You can explain why each issue is or is not addressable. You have baseline photographs for comparison.
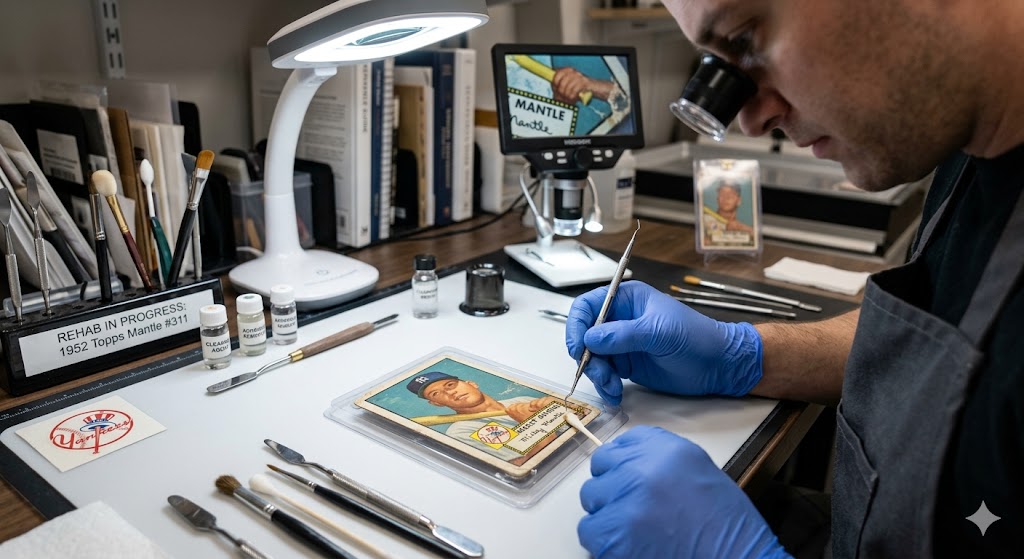
Step 2: Environment and Tool Preparation
Objective: Create a controlled workspace that prevents new damage during rehabilitation.
Work on a clean, flat surface covered with a lint-free microfiber mat. Eliminate air currents that carry dust. Wash and dry your hands thoroughly, then consider wearing nitrile gloves for high-value cards.
Assemble your tools: soft-bristle brushes (natural hair, not synthetic), microfiber cloths, compressed air (moisture-free), and card-safe cleaning solutions if needed. Never use household cleaners, alcohol, or abrasive materials.
What to avoid: Working in dusty environments. Using paper towels or tissues that leave fibers. Touching card surfaces with bare fingers during the process.
Success indicators: Your workspace passes a white-glove test. All tools are clean and appropriate for card contact. You can work without reaching across the card or creating contamination risks.
Step 3: Surface Rehabilitation
Objective: Remove surface contaminants without affecting the card’s original finish or structure.
Start with the gentlest method. Use compressed air from 6 to 8 inches away at an angle, never perpendicular to the surface. This removes loose particles without embedding them.
For fingerprint oils and light residue, use a soft brush with minimal pressure in one direction only. Never scrub in circles. For stubborn contamination on glossy surfaces, a barely damp microfiber cloth with distilled water may be appropriate, but test on a low-value card first.
What to avoid: Applying pressure that could create surface indentations. Using any cleaning solution not specifically designed for collectible cards. Attempting to remove contamination that has bonded with the card surface.
Success indicators: Surface debris is removed. No new scratches or marks are visible under magnification. The card’s original finish appears unchanged.
Step 4: Edge and Corner Stabilization
Objective: Address minor edge lifting and corner issues without altering the card’s structure.
Edge lifting occurs when card layers begin to separate. For minor lifting, gentle pressure with a clean, soft tool can lay the edge back down. This is stabilization, not repair. You’re returning the card to its original state, not creating a new one.
Corner softness cannot be reversed. However, you can prevent further deterioration through proper handling and storage. Never attempt to sharpen corners through any mechanical means.
What to avoid: Using adhesives of any kind. Applying heat or moisture to manipulate card structure. Attempting to address severe delamination, which requires professional evaluation.
Success indicators: Minor edge lifting is stabilized. No adhesive residue is present. The card’s structural integrity is maintained or improved.
Step 5: Final Verification and Documentation
Objective: Confirm rehabilitation results and prepare the card for grading submission.
Re-examine the card under the same lighting conditions used in assessment. Compare directly to your baseline photographs. Look for any unintended consequences: new scratches, fiber deposits, or surface changes.
Allow the card to rest for 24 hours in a protective sleeve before final inspection. Some issues only become visible after the card has stabilized. Document the final condition with photographs.
What to avoid: Rushing to submit immediately after rehabilitation. Skipping the comparison to baseline documentation. Ignoring subtle changes that might indicate a problem.
Success indicators: The card shows measurable improvement in addressable areas. No new damage is present. You can confidently explain every change from the original condition.
Practical Application: Before and After Scenarios
Scenario 1: The Dusty Vintage Find
A 1986 Fleer Michael Jordan rookie emerges from a collection stored in a garage for decades. Surface dust obscures the card’s true condition. Light fingerprint oils are visible under angled light.
Proper rehabilitation: Compressed air removes loose dust. Soft brush addresses remaining particles. The card’s actual condition is now visible for accurate grading. Result: The card grades based on its true condition, not contamination.
Scenario 2: The Edge Lift Dilemma
A 2003 Topps Chrome LeBron James rookie shows minor edge lifting on one corner. The card otherwise presents well.
Proper rehabilitation: Gentle stabilization lays the edge back without adhesive. The card’s structure is preserved. Result: Graders assess the card’s actual condition rather than progressive deterioration.
Scenario 3: The Temptation to Over-Correct
A 1989 Upper Deck Ken Griffey Jr. rookie has a visible surface scratch and yellowed borders from UV exposure.
Proper approach: Accept that these issues are permanent. Surface cleaning removes dust but cannot address the scratch. Border yellowing is structural and any attempt to whiten it constitutes alteration. Result: Submit as-is or hold for personal collection.
Common Mistakes and How to Avoid Them
The most frequent error is attempting to rehabilitate cards beyond their potential. A card with structural damage will not become a PSA 10 regardless of surface preparation. Accepting this reality saves time and prevents harmful intervention.
Many collectors use inappropriate tools. Paper towels leave fibers. Cotton swabs deposit lint. Household cleaners damage surfaces. Invest in proper supplies or partner with professionals who have them.
Impatience causes preventable damage. Rushing assessment leads to missed issues. Applying too much pressure creates new problems. Submitting immediately after rehabilitation misses issues that appear over time.
Finally, some collectors confuse acceptable preparation with prohibited alteration. When in doubt, stop. A card submitted in original condition is always preferable to one that raises authenticity questions.
What to Do Next
Start with a single low-value card. Practice the complete assessment, preparation, intervention, and verification process before working on valuable pieces. Build muscle memory for proper technique.
Consider whether professional rehabilitation services make sense for high-value cards. Graden Cards offers in-house rehabilitation as part of their grading preparation services, combining proper technique with direct submission to PSA, BGS, and SGC.
Document your results over time. Track which techniques produce consistent improvements and which cards benefit most from rehabilitation. This data improves your decision-making for future submissions.
Return to this guide as a reference, not a checklist. Each card presents unique challenges. The framework remains constant; the application adapts to what you find. For more comprehensive rehab, submit through Graden Cards LLC today!
Frequently Asked Questions
What’s the difference between card rehabilitation and card alteration?
Rehabilitation removes foreign contaminants and stabilizes existing condition without changing the card’s original structure. Alteration manipulates the card to artificially improve its apparent grade. Grading companies accept properly rehabilitated cards and reject altered ones. The key test: are you revealing the card’s true condition or creating a false impression?
Will cleaning my cards before submission improve their grades?
Proper surface cleaning can improve grading accuracy by allowing graders to assess the card’s true condition without contamination interference. However, cleaning cannot improve underlying condition issues like scratches, corner wear, or centering problems. Think of it as removing obstacles to accurate assessment, not artificially boosting grades.
How do grading companies detect card alterations?
Modern grading uses multiple detection methods. AI-assisted scanning identifies microscopic inconsistencies in surface texture and edge profiles. PSA’s Genamint fingerprinting technology recognizes previously graded cards to deter crack-and-resubmit manipulation. Human graders are trained to spot chemical residue, trimmed edges, and filled scratches under magnification.
Can I fix corner damage on my sports cards?
Corner softness and wear cannot be reversed through legitimate rehabilitation. Any attempt to sharpen corners mechanically or fill in damage with foreign materials constitutes alteration and will result in rejection or authentication failure. You can prevent further deterioration through proper handling and storage, but existing damage is permanent.
Should I rehabilitate cards myself or use a professional service?
For cards under $100 in potential value, learning proper technique on your own makes sense. For higher-value cards, professional services reduce risk. Professionals have proper equipment, controlled environments, and experience identifying which cards will benefit from rehabilitation. The cost of professional preparation is typically far less than the value lost from amateur mistakes.
What tools do I need for basic card rehabilitation?
Essential tools include: a daylight-balanced LED light source, soft natural-hair brushes, lint-free microfiber cloths, moisture-free compressed air, nitrile gloves, and a clean microfiber work mat. Avoid household cleaners, paper products, synthetic brushes, and any adhesives. Quality tools cost $50 to $100 and last for years with proper care.
Sources
- https://www.si.com/collectibles/over-26-million-cards-graded-in-2025-how-the-market-exploded
- https://www.prnewswire.com/news-releases/2025—sports-memorabilia–trading-cards-market-size-estimated-at-33-billion-mark-and-is-expected-to-reach-271-2-billion-by-2034–growing-at-a-cagr-of-22-1-market-decipher-302332370.html
- https://christopherfinlan.com/2025/07/29/time-to-automate-why-sports-card-grading-needs-an-ai-revolution/
- https://gradencards.com